You many never have considered building your own wheels. Too complicated, too likely to get it wrong, too easy to get someone else to do it. All fair points, but it’s not actually very difficult. The end result looks quite complicated but getting there involves fairly simple steps…
There are all sorts of fancy spoke patterns out there, but there’s no very good reason to use anything but regular three-cross spoking so that’s what we’re doing here. We’re doing a front wheel, but the principle is the same for rears.
 1. You’ll need a rim, a hub and some spokes. What they are is relatively unimportant and can be argued until the cows have not only come home but redecorated. The main thing is to make sure that the rim and hub have the same number of holes in them and that the spokes are good quality and the right lengths. Stick to Sapim or DT double-butted spokes and brass nipples and you won’t go far wrong. Length depends on whether you’re doing a front or rear wheel and what rim and hub you’re using. If you’ve got a decent LBS they’ll know the lengths, otherwise there are loads of spoke length calculators on the web – Google for “spoke length calculator”. If you happen to be lacing a Mavic 618 rim to a Shimano XT disc hub you want 260mm on the disc side and 262 on the other side…
Before you start make sure the spokes are all sorted out into lengths, and put a bit of light oil on the threads. Chain lube’ll do.
 2. Lacing a wheel hinges on getting the first steps right. Everything else follows from here. Take a comfy seat with a cup of tea readily to hand, and place the rim on your lap with the spoke hole opposite you. You’ll notice that the spoke holes are staggered up and down – position the rim so that the hole to the right of the valve hole is lower than the one to the left. Hold the hub in the middle of the rim with its right-hand end down.
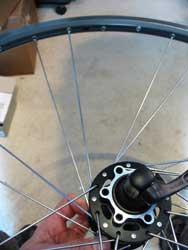
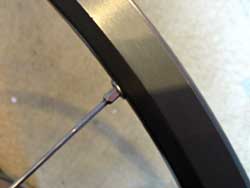
 3. Time to start putting spokes in. The first set are the “inbound” spokes. These’ll end up with their heads on the outside of the hub flange. Drop a spoke of the correct length (this is the left side of the wheel) into alternate holes in the hub flange, then feed the threaded end of one of them into the spoke hole to the left of the valve hole and thread a nipple on to it. Just do it up three or four turns for now.
 4. Work around the wheel putting the rest of the set of spokes in every fourth hole and threading nipples on to them. Each of these spokes should end up in a hole that’s offset upwards. If they don’t, you’ve done something wrong…
 5. Now you need to do the inbound spokes on the opposite side. On rear or disc brake wheels these’ll be a different length so make sure you’re using the right ones. Turn the wheel over so the valve hole is still away from you with one of the first set of spokes in the hole now to its right. Drop spokes into alternate holes on the new upper flange, but make sure they’re the right alternate holes – the flanges are offset so the holes on the left aren’t directly opposite the ones on the right. You’re looking for the holes to the right of the ones occupied by spokes – just push a spoke through parallel to the hub to figure it out.
 6. Take the spoke that’s in the hole to the right of the very first spoke you put in and put the threaded end through the next hole to the right in the rim. This should be a hole away from the valve hole. Go around the wheel putting each of the second lot of spokes into the holes to the right of the ones occupied by the first spokes and put nipples on them.
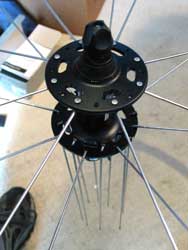 7. So far so good. Now move on to the outbound spokes. If the spokes are quite a snug fit in the flanges, drop them all through the lower flange before turning the wheel over (remembering that these are left-hand spokes out of the other pile again…). Then turn the wheel over and flatten the spokes out. If they’re a bit of a loose fit they’ll all fall out when you turn the wheel over unless you grab a handful of them. One way or another, you’re looking for spokes with the heads in on the left-hand flange which should be upwards.
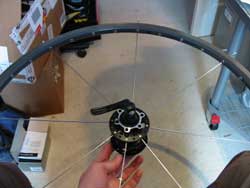
 8. So far all the spokes have been lying radially. But in the finished article they’re tangential to the hub flanges. This is where that happens. Hold the rim and twist the hub anticlockwise. The first spoke you put in (to the left of the valve hole) should be pulling away from the valve hole. Make sure that all the spoke nipples drop into the holes in the rim properly.
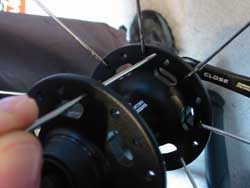
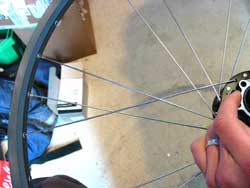 9. Now thread the crossing spokes, which are the ones currently not attached to the rim. We’re doing a three-cross wheel, so each of these spokes needs to cross over three others. Take one and aim it in the opposite direction to the others. The first crossing is over the inbound spoke in the flange hole immediately to its left. The second is over the next inbound spoke round, and the third is under the next inbound spoke again. Then put the threaded end of the spoke through the next empty hole past the last spoke you crossed. There’ll be a spoke from the other side of the hub between the last crossed spoke and the one you’re threading. Don’t worry, it’ll make sense when you do it for real… Go around and thread all the spokes in the same way.
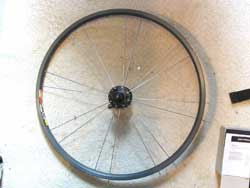
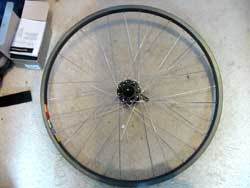 10. Repeat the last two steps for the other side of the wheel. It’s easy to identify the relevant rim holes now, as there aren’t many left. With everything in place your wheel should look a bit like this, with the valve hole between two roughly-parallel spokes and all the spokes on one side of the hub going into rim holes offset to the same side. If it looks all asymmetrical or some of the spokes wouldn’t reach you’ve done something wrong…
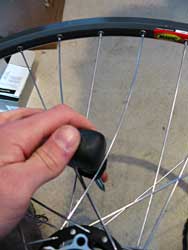 11. If all is well, grab a screwdriver and use the handle to push the outermost spoke crossings in towards the hub. This’ll make sure that the spoke nipples are all seated and that everything’s even on both sides of the wheel.
 12. In theory, the rim was round and straight before you laced it up, so as long as you keep all the spokes evenly tensioned it should stay round and straight. It won’t, but if you pay attention to tensioning it’ll be very close. Start by tightening all of the nipples so there’s the same amount of thread showing on each.
 13. Finally, start at the valve hole and work around the wheel tightening the spokes a turn at a time. Don’t look at the spokes end on – there’s a chance they’ll break as you tighten them and shoot out of the rim. Put a rim strip on if you’ve got one handy. You’ll need it when you’re finished anyway. Keep tightening the spokes until they’re as tight as your comparison wheel.
At this point you should have a correctly-laced, evenly-tensioned wheel that’s generally fairly round and straight. All that remains is to tweak out those final few wobbles as we covered in our wheel truing article…