Truing a wheel isn’t the easiest thing to explain, but hopefully after watching this video you’ll realise that the act itself isn’t as tricky as you might think.
Hopefully that made a bit of sense? But here’s a bit more info…
First of all I should probably have said that it’s a good idea to first practice on an old wheel rather than on your fancy carbon ones. If the wheel is at the end of its life anyway then it doesn’t matter if you mess it up (you shouldn’t do anyway), plus it gives you the chance to mess around a bit and really see what difference tightening and loosening spokes makes.
I think the key thing is to concentrate and make sure you are fully aware of what is going on. You should be able to see the rim move as you alter spoke tensions, and if the rim is heading in the wrong direction you’re obviously doing something wrong. The other key thing is to try and work on all the aspects at once, i.e. side to side movement, up and down movement, and dishing. This might sound like it’ll fry your brain, but it shouldn’t and in the long run you’ll end up with a far better result and it should take you less time. Of course to deal with all these things you have to take the tyre off your wheel, but it’s always worth making sure that you have a rim tape in place as sometimes spokes can snap, and if there’s nothing in place to stop them they can fire out at an incredible speed. Not good when the chances are that your eye could well be in the firing line!
One thing that I perhaps didn’t make 100% clear in the video is that if you have a side to side wobble but the rim is fine up and down, then you really want to be tightening on one side and loosening on the other. The same goes for if you have up and down issues but the rim is fine side to side, although in that case you’ll either be tightening or loosening spokes on both sides. Because of the different tensions involved on either side of the wheel don’t expect half a turn on one side to have the same effect as half a turn on the other side. And remember, always try and remove any ‘wind up’ that you put on the spokes. If you have bladed spokes then this is really easy to spot. Oh, and don’t waste too much time trying to get things absolutely spot on around the join area of the rim as more often than not this is impossible to achieve simply because of the way the rims are constructed. Making sure the tension in that area is fairly even in relation to the rest of the wheel is probably more important. And talking of even tension, with a quality rim that’s brand new you should be able to get a pretty even tension all round, but of course when you have physically bent the rim you are always going to have a greater variance of tension. You just want to try an avoid any seriously loose ones, and if you find that’s impossible then it’s almost certainly time for a new rim.
Obviously all this talk is about truing a wheel when you’re at home, but sometimes there’s a need to do emergency repairs whilst out riding. If you buckle your wheel so much that it starts to make your tyre rub on your frame or forks then you really need to sort it out asap. In this scenario you only need to really worry about side to side movement so you can leave the tyre on and do a rough bit of tightening and loosening to alleviate the problem. If you’ve practised doing the job properly at home beforehand then you should find this a doddle, and then when you get home you can try and sort it out properly.
Anyway, if you have any questions then just fire away and I will try and answer them. Until then, here’s a little bit more info on the equipment that you’ll need…
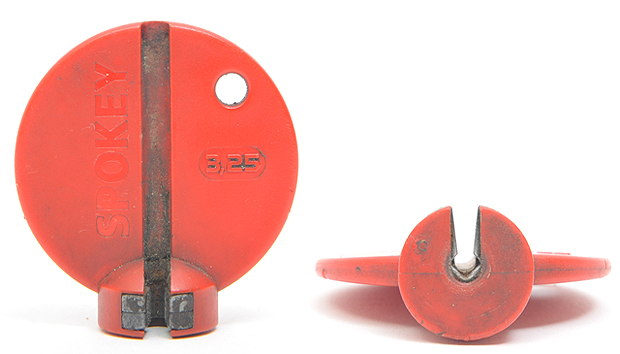
The most important tool is obviously a spoke key, and this Spokey Pro is my personal favourite firstly because I find it very comfortable to use, but more importantly because the design locks onto more sides of the nipple than other types, reducing the chances of you rounding the nipple off (it’s always worth having a couple of spare nipples in your tool box just in case this does happen though). At £6.49 it’s also probably one of the cheapest tools you’ll buy. Just don’t be tempted to save a quid by buying the non ‘Pro’ version. The Pro has two of the metal inserts, and therefore twice the contact area…and therefore it’s twice as less likely to damage a nipple.
Whichever make of spoke key you end up going for, just make sure it’s the right size! There are a couple of different sizes of nipples but luckily pretty much all quality ‘standard’ wheels use the same ‘Euro/US’ size. Basically the spoke key should be a snug fit, if it’s baggy it’s not the right size and it will damage your nipples. There are obviously a fair few wheel wheels on the market, like the high-end Mavic wheels, that use specific nipples. To work on these you will of course need the appropriate spoke key, a standard one will not work.
My final advice about spoke keys would be not to use the one on your multitool as I have yet to come across a decent one. A proper spoke key like the Spokey Pro weighs next to nothing anyway, so I always carry one in my backpack alongside a multitool.
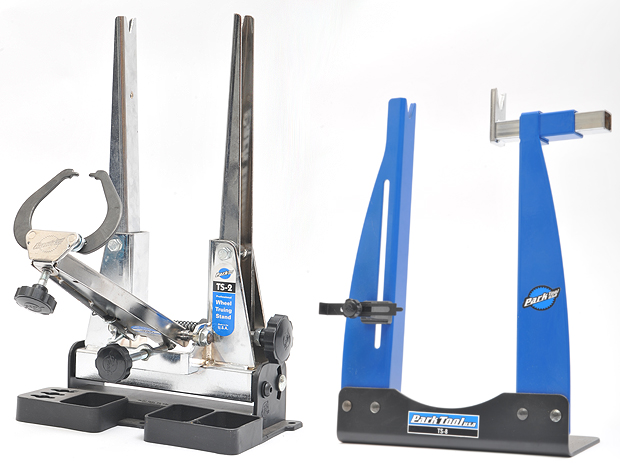
A truing stand isn’t essential, and you’ll see a free alternative below, but there’s no doubting that they make the job easier. There are a whole load of different designs out there, ranging from the insane £1399.99 DT Swiss one right down to far simpler designs that cost around £50. The two shown above are both made by Park and the one on the left is the TS-2 which you’ll find in most bike workshops. At £259.99 I doubt many home mechanics will be able to justify it though, but the TS-8 on the right is a bit more reasonably priced at £124.99. In general the more you spend the quicker and easier they will be to use, but with a bit of patience you should be able to produce just the same results on a cheap one.
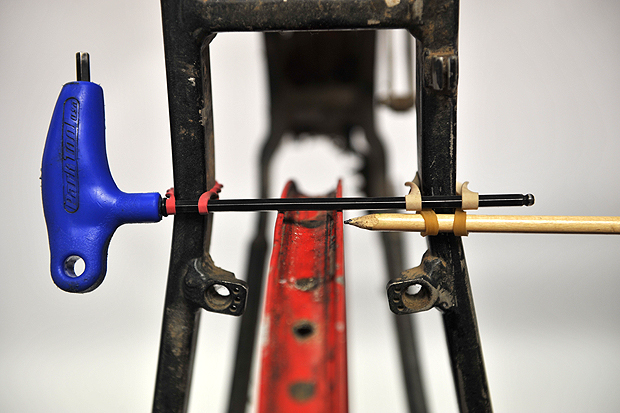
If you don’t want to spend any money on a truing stand then a setup like the one above is the best way to go. Obviously you can also do this kind of thing on your forks too if you’re dealing with a front wheel. If you are doing a rear wheel though it’s worth making sure that your chain isn’t on your cassette as you really want to be able to spin the wheel freely in both directions. Oh, and you get bonus points if you can tell us what frame this is!
So hopefully you’re now ready to go, and I also hope there hasn’t been too much childish sniggering about so many mentions of the word ‘nipples’. And like I said earlier, if you’ve got any questions then just fire away.
Sponsored by ATG Training: authorised by the Association of Cycle Traders to provide Cytech technical training courses.
Dirt users are entitled to a 50% discount off Cytech Technical One Theory Online (down from £139.99 to £69.99). Just quote the code: DIRT001. The offer expires 30/9/12 and you can find out more and apply here.