Suspension forks are pretty complex things and there’s a lot that could go wrong. Regular fettling keeps them sweet, though. Thankfully most forks don’t need as rigorous a maintenance schedule as they used to (when it seemed like you had to strip the whole thing down weekly) but it’s still well worth spending a bit of time on them.
We haven’t gone the whole hog here – stripping apart the actual damping mechanism will be an article into itself. Partially because it’s quite involved, partially because we didn’t want to hit you with too much info at once but mostly because we could lay our hands on a critical tool this morning… We’re looking at a RockShox Psylo SL, although the principles are common to several other forks.
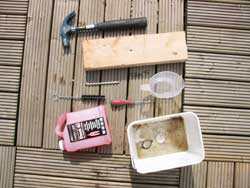 1. You’ll need a rubber-faced mallet (or a block of wood and a hammer), a 5mm Allen key, some fork oil (5wt is recommended for these forks), something to catch old fork oil in, something to measure new fork oil in and a collection of rags.
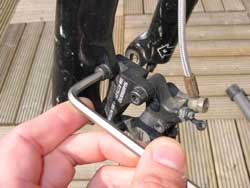 2. You can take the fork out of the bike if you like, but for this level of service you don’t really need to. What you will need to do is clean the whole thing and disconnect the brake. Unbolt the caliper if you’re running a disc or unhook the cable at the lever if you’re running a V-brake.
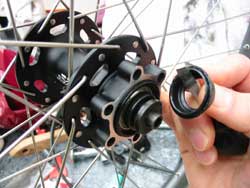
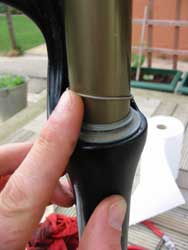
 3. Keeping the fork clean is critical. The wiper seals are usually pretty effective, but if the fork’s always filthy some stuff will find its way in and wreak havoc. RockShox recommend further seal attention every 25 hours of riding. Lift the wiper seals by gently prising them up with a small (but ideally quite wide) screwdriver – wrap a rag around the stanchion to prevent any slippage leading to nasty gouging.
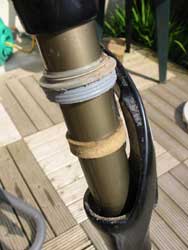 4. Push the wiper up the leg. Underneath it you’ll see a foam ring. This should be soaked in oil (most manufacturers sell a specific oil for this purpose that’s a little thicker than fork oil) which keeps the interface between stanchion and wiper seal well lubricated and provides an extra barrier between the outside world and the internals of the fork. If that’s all you need to do, just press the wiper seals back in. If your fork needs the next level of fettle (recommended every 50 hours) then leave them out and lift out the foam rings too.
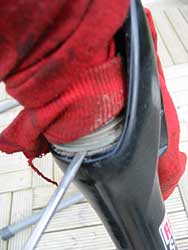
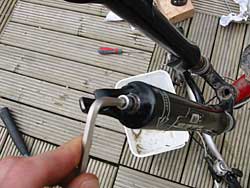
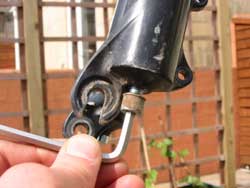 5. The next step is to get the lower leg casting off. It’s held on with bolts at the bottom of the fork legs. The right-hand leg has a rebound adjuster knob – this just pulls out. Put it somewhere safe, and then undo the bolts on both legs four full turns. Inside the fork the damper and spring shafts are wedged into the bottom of the lower leg. To free them so you can get the lowers off, tap the bolts upwards. A rubber-faced mallet is best. Failing that, a suitably-sized block of wood and a hammer do the job. Once the bolts have gone back flush with the lowers you can undo them completely. Some oil might dribble out at this point, so have something to hand to catch it with.
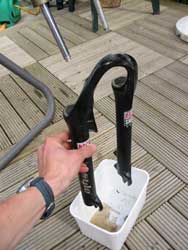 6. At this stage you should be able to slide the lower leg casting off the stanchions. It might be a bit reluctant to come off – a little bit of wood/hammer action usually sees them right. Once they’re clear of the damper and spring rods inside, the rest of the oil bath oil that lubricates the bushings will come out, so keep that receptacle handy. It’ll probably be a bit manky. If none comes out, you’ve left the fork alone too long…
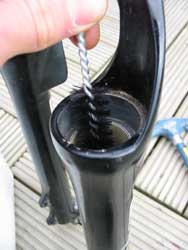 7. With the fork in two bits, clean everything up. Slide the foam rings and wipers off the stanchions and clean them. Wipe down the stanchions, and clean out the inside of the lower legs with a long bottle brush and some degreaser. Pay particular attention to the bushings inside the lowers. Make sure it’s all dry before you start putting things back together.
 8. First reassembly step is to push the wipers and foam rings back on to the stanchions. Push them nearly up to the top. Then slide on the lower leg casting. You should feel some slight resistance when the bottom of the stanchion reaches the lower bushing. Don’t push the lowers past this point just yet. Drop the foam rings back into the top of the lowers and press the wipers back into place. You may find it helps to gently lift the retaining springs off, push the wipers home and then pop the spring back on.
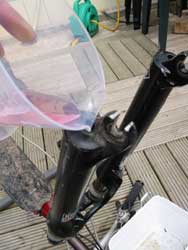 9. Then flip the fork over (with attached bike, if present) and pour 10cc of 5wt fork oil into the right-hand leg. This sits in the fork and lubricates the interface between stanchion tube and fork leg. You’re supposed to put 20cc in the top of the left-hand leg so it coats the spring itself and leaves enough left to lube the bushings, which means taking the spring stack out by undoing the top cap. Unless we’re taking the whole fork apart we’re too lazy to do this so we just pour it in the bottom instead. Make sure it goes inside the fork leg rather than down the inside of the damper or spring rod.
 10. Finally, push the lower legs fully home and replace the bolts at the bottom, being sure to put the one with the hole in it in the right-hand leg. They should be tightened to 60in lb, torque wrench fans. Or snug them down for everyone else. Pop the rebound adjuster knob back in and you’re good to go…