This tech video might be a bit too simple for some of you, but it seems like there’s still a load of riders who haven’t got a clue how to change a cassette, so hopefully this will cure that.
If you missed some of the finer detail then hopefully these photos will clear up any loose ends.
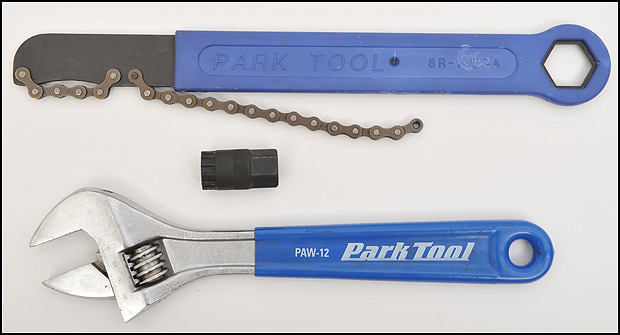
First up we have the tools that you’ll need. At the top is a chain whip which you’ll need to stop the cassette spinning when you try to remove it. You don’t need this when you’re fitting a cassette, and although there’s a few subtle variations of this tool they all do the same thing. If the chain ever breaks on your chain whip then don’t worry too much because they’re normally pretty easy to fix by either banging in a new pin or using something like a SRAM powerlink.
In the middle is the cassette lock-ring tool which simply fits into the splines on the lock-ring. My advice here would be to not bother scrimping (the same goes for all tools really) as I’ve lost count of the number of broken cheap ones that I’ve seen. Buy something decent like a Park one and it’ll last you forever.
Finally you need something to turn the lock-ring tool. Some of these can be used with a socket set handle, but there’s nothing wrong with a good old adjustable spanner and everyone should already have one of them in their toolbox.
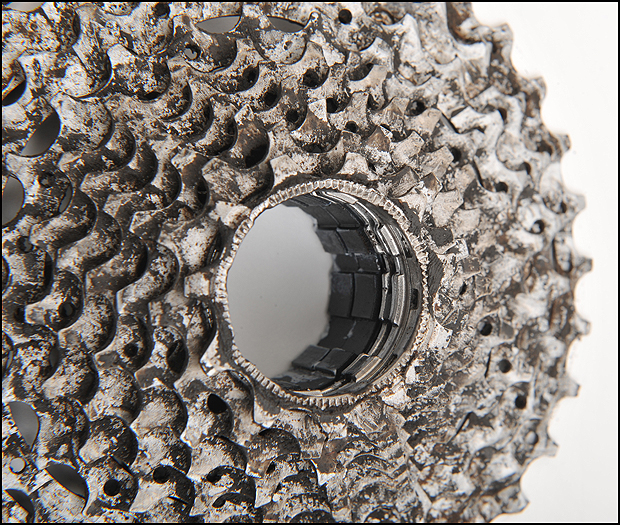
There’s really only one way that you can fit a cassette as the various size splines mean that it simply won’t go on any other way. I find the quickest way to make sure you’ve got it the right way around is to look for what I call the ‘fat’ bit. You can hopefully clearly see it in the photo above and you simply need to match it up with…
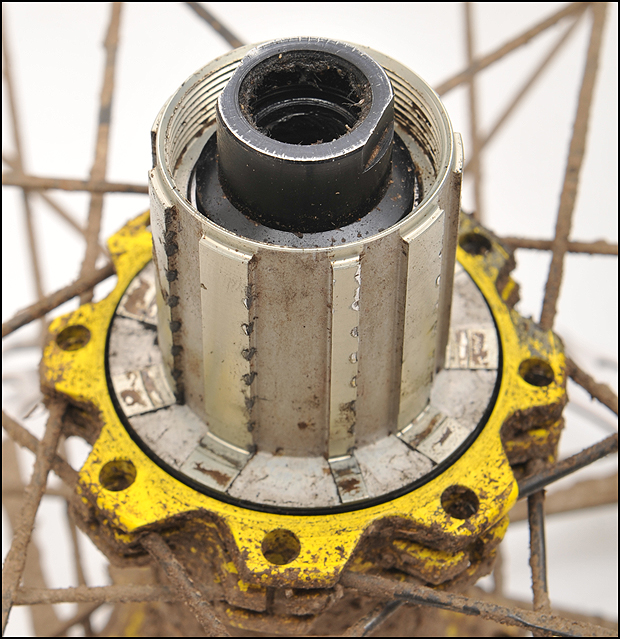
The matching fat bit that you can see here on the freehub body. You just need to make sure that when you’re putting it all on you don’t miss out any spacers. If you have missed some it’ll become obvious pretty quickly as some of the cogs will be far too close together.
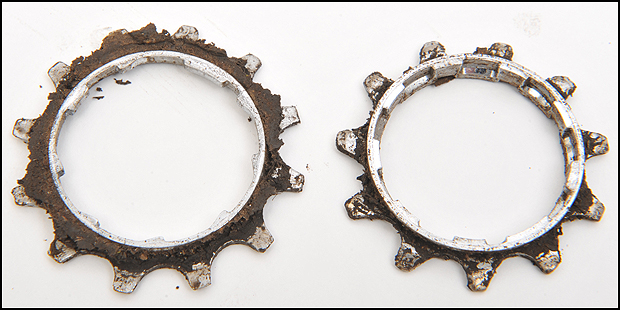
Finally, and as I pointed out in the video, it’s worth checking that the lock-ring hasn’t just bottomed-out the smallest cog onto the freehub body rather than locked the whole cassette into place. As you can see in the picture the smallest cog (on the right) has a step on the inside unlike the rest of the cogs (as illustrated on the left). If the tolerances aren’t quite right then sometimes this step can hit the freehub body before everything else is clamped up tight. You’ll know if this is the case because although your lock-ring is tight you’ll still be able to move the bigger cogs a little. It’s increasingly rare for this to happen these days, but if it does it can be easily solved with a thin washer which you put on the freehub body before putting any other part of the cassette on.
So hopefully you should all now be able to change your cassette, and now that you can do that you could always have a go at servicing your freehub body as we showed here and here.
Sponsored by ATG Training: authorised by the Association of Cycle Traders to provide Cytech technical training courses.
Dirt users are entitled to a 50% discount off Cytech Technical One Theory Online (down from £139.99 to £69.99). Just quote the code: DIRT001. The offer expires 30/9/12 and you can find out more and apply here.